Thursday, October 29, 2009

back to the basics


It's been a while since I posted a traditional etegami, so I thought it was time to review the basics. Etegami has very few rules, but there are certain characteristics that combine to make it what it is, and not some other kind of art.

Traditional etegami is: (1) hand-drawn artwork accompanied by hand-drawn words on postcards, and (2) usually depicts subjects from everyday life, especially those that reflect the changing of the seasons.

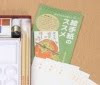
The equipment for traditional etegami usually includes: (1) absorbent washi postcards (2) ink brushes of various lengths and thickness (3) sumi ink (4) gansai paints (5) a name seal to affix to the work when it's finished.

The method for traditional etegami usually involves: (1) "living lines"~the wobbly, blotchy lines of inconsistent thickness that result from very, very slow strokes of the ink brush when forming the outline of the subject (2) a brief session of "living lines practice" every time you sit down to make etegami (3) "laying" the color on the card, rather than making strokes, and letting it spread naturally according to the character of the washi paper used (4) a limited selection of colors for each work, making the colors darker or lighter by judicious use of water, rather than by mixing different colors together (5) leaving areas of the drawing uncolored, rather than completely filling it in.

Having listed all these characteristics, I should say that etegami can be done on any kind of paper with any kind of tools, and if you use a paint brush on non-absorbent paper, you will have to use strokes to color it. Many etegami artists paint scenery, especially as a kind of picture-diary when they travel. But it isn't etegami without the addition of words. And it isn't really etegami unless it is meant to be posted to someone, or is at least in a form that can be posted at any time. Digital artwork accompanied by words and emailed to someone could be called etegami, as nontraditional as that form is. And you've seen my recent attempts to turn collage art into another nontraditional form of etegami.

The autumn-themed etegami I posted above depicts a kabocha, or Japanese pumpkin. And the accompanying words say exactly that: Japanese Kabocha. No humor, poetry, or delicate nuances on this one.

Tuesday, October 27, 2009

etegami collages


I've been going a little bit crazy over collages lately, thanks to being stimulated by the works of Western mail artists, who tend to be very collagic (? well, you know what I mean). My versions are always a combination of pictures and words, which technically qualifies them as Etegami. But I wasn't certain enough of this interpretation to introduce the collages on this blog. Then, the other day, I stumbled onto a blog about etegami made with fabric fragments. It was one more in a series of eye-opening encounters for me. You'll have to see these for yourself. The blog, called Ponpoko's Etegami, is in Japanese, but I think you will be able to see the images. Click here. The pictures are formed with bits of cloth and yarn. Sometimes, the artist writes the accompanying words by ink brush, and other times she forms them from yarn or fabric. If these delightful postcards can be called etegami, then my collages certainly can. If any readers of this blog are more comfortable working with fabric than with ink brushes and paints, you won't find me resisting that approach anymore. Just don't forget the element of words. The image I posted here is a collage of photos pasted onto a background made from the kind of hand-dyed wispy washi used in the art of chigiri-e, which I've mentioned in previous posts.

Monday, October 19, 2009

make your own name seal


If you already have an interest in traditional Japanese Art, you probably realize how important that final pressing of the name stamp is to the overall appearance and balance of the work. And if this blog is your first exposure to Etegami, you probably noticed, and were curious about, the name seal that is always pressed somewhere on the card in red ink. The common name for these name seals is hanko. They are usually carved with the hiragana sign for the first syllable in the artist's given name. Sometimes they are carved with the entire given name, and sometimes they are carved with other words that enhance the artwork, such as the character for "Spring," or "Welcome the New Year," or something else that applies to the season.

If you go to an art supply or stationery store in Japan, you are likely to find a nice collection of ready-made hobby hanko, even ones that have a cozy, home-made feel to them. Using store-bought seals is a great option, especially if you are a beginner. But soon you are sure to get the itch for a name seal of your own design and carving.

Furthermore, you may be one of those people whose name begins with a syllable that is nowhere to be found among the racks of commercially produced name seals. I belong to this group. My name begins with the syllable De (Te with two dashes next to it), and I haven't met a Japanese person yet whose given name starts with that syllable. So from the beginning, I had to make my own hanko. I did this the way most etegami artists do, by carving my syllable into a rubber eraser.

The photo posted at the top was scanned from an introductory Etegami textbook, and illustrates the steps to making a hanko. The steps are very simple: (1) Draw your initial or syllable on a smooth piece of paper (tracing paper is good) with a soft lead pencil. (2) Press the drawing against a clean, flat piece of eraser, and rub gently till the drawing has transferred from the paper to the eraser. The transfer will be a mirror image. (3) Using a sharp craft knife or carving tool, cut away the white part, or alternatively, cut away the dark part, depending on the effect you desire. (4) Ink the seal and press on paper to see where you still need to cut away. Keep doing this till you are satisfied. If you want to start over, slice off the layer you were working on, and go through the steps again.

I've attached a photo of some of my own hand-made hanko. Some represent my name in various forms (De, DeBi, DeBoRa, dd) and others are images (slice of watermelon, mouse's paw print, human foot print, leaf, star, wind chime). I use the images to add humor or otherwise personalize certain etegami. They're easy and fun to do.

Wednesday, October 14, 2009

a broccoli exhibit


I stumbled across a delightful post about etegami the other day and received permission to share the link with you. The blog itself is called Daily Onigiri and features news from Japan, but the post that caught my eye was titled "Etegami: Japanese Picture Letters," and what made it special were the photos of an etegami exhibit at a local train station. Dozens of etegami focused on just one subject: Broccoli! I've seen many, many etegami exhibits, even exhibits focused on one theme (such as war memories), but I have never seen an exhibit focused on a single subject before. It was visual proof of what I am always saying, that each etegami is a unique work of art. Not only because each etegami artist internalizes what he sees differently and may have different skills or even tools for expressing it, but also because each head of broccoli-- even though it may at first appear like a clone of every other broccoli-- is different from the others. Isn't it cool how each etegami in the exhibit has its own character?

Sunday, October 11, 2009

ainu etegami


I made a new mail art friend recently, who has a keen interest in minority languages. That inspired me to try an etegami that reflects the culture and language of the Ainu, the native people of northern Japan. It happens that I have been translating Ainu folklore into English for over ten years. Click here to see my blog about the Ainu translation project, Project U-e-peker.

The etegami I posted is a representation of the Shimafukurou (Blakiston's Fish Owl) which the Ainu have traditionally regarded as the guardian of Ainu villages. It is the largest owl in the world, with a wingspan that can extend to six feet (2 meters), and it is an endangered animal. The Shimafukurou features in many Ainu folktales, and I've quoted the opening lines of the most famous one on this etegami. The English version of this story can be read here, if you are interested.

Sunday, October 4, 2009

beyond washi


The first time it hit me that etegami (at least a non-traditional version of it) could be done on material other than washi, was when one of my etegami colleagues showed me a card cut out of corrugated cardboard. The card had been cut out so that the logo of a cantaloupe was on one side, leaving the rest of the card free for a thank-you note. Other clever cut-outs and drawings decorated the blank spaces on both sides of the card. It turned out that my colleague sends a case of fruit to this woman every year, and every year, she returns a thank-you card crafted from the cardboard carton that contained the fruit.

Once or twice, I have run out of washi postcards and had to make do with cutting cards from old file folders. I blogged about it here. But it's been my recent exposure to international mail artists who cut their cards from old cereal and cookie boxes that really got me thinking about the possibilities. As appealing as the idea of recycling old cookie boxes is, it simply isn't possible to reproduce on such material the lines an ink brush makes on washi.

That's where this nifty product comes in useful: iron-on washi. These thin sheets of washi-like paper come 50 to a pack. They respond to sumi ink and gansai paints very much like ordinary washi postcards do. And they're much cheaper, so it doesn't hurt so much throw a sheet away if you mess it up. They're perfect for making etegami out of otherwise unsuitable card material. I dug out some great oriental-patterned boxes that had once contained traditional Japanese confections, thinking the postcards I could make from them would be sure to please someone with an eye for beautiful patterns. I painted my pictures on the iron-on washi sheets and ironed the drawings onto the un-patterned sides of my make-shift cards, leaving the patterned sides for address labels and postage stamps. They turned out great. So great, I almost don't want to send them....